Over the years as coffee became more and more to bob's liking, the idea of doing a cappuccino cheesecake lingered in the back of his mind but somehow the thought of just adding instant espresso powder to the cheesecake batter seemed a bit unacceptable, for reasons that were not easily put into words. We've shown our eager willingness to take shortcuts on many occasions in the past, but this one just wasn't happening. Until the seductive food photography of a luscious specimen on a deep chocolate high top crust caught bob's eye in a quick in-store scan of the latest William-Sonoma oversized seasonal food magazine Taste. This was the one.
A suitable Saturday night target dinner soon presented itself. Friday afternoon the head chef tears himself away from his office a few hours early in a rare escape from workaholism. Home to memorize the needed ingredient list for items not on hand. Off to the local supermarket, once a local family owned chain but recently gobbled up by one of those ugly mega-corporate food chains that shut off bob's supply of recipe ready hazelnuts in no short order. Home with the catch, bob finds that once again not writing down a list has proved to be a mistake—the instant espresso "preferably Medaglio d'Oro"—had slipped his mind. Back to the stealth Safeway (it retained its local name Genuardi's) and no instant espresso powder of any kind! 5:30pm and 30 minutes till closing at Carlino's—maybe they'd have something authentic. But Friday traffic from hell is in full swing in the suburbs and after a false start east confirming the hopelessness of the attempt, bob turns west towards the upscale supermarket alternative—maybe they have something acceptable.
Along the way it occurs to him that he could grab a treat of oven-ready prepared escargot (snails) from the French pastry shop which had recently been offering a few French imports not in the usual pastry/bread/chocolate lineup of the business. Yeah, but how do you get those little suckers out of their shell after you bake them, he asks. Easy. Use a pickle fork. Back on the road bob realizes he forgot to carefully read the handwritten sign of baking instructions: "Back at 350� for ... minutes." Absentmindedness strikes again, but if it hadn't struck the first time, there wouldn't be any snail passengers at this point. We'll just have to fake it.
The moment of truth arrives. Will this upscale store have some decent substitute for the Medaglio d'Oro espresso powder? A miracle. No substitute needed. There it is. And bob grabs a jar of caramel sauce he spots just in case as a backup.
This cheesecake seems to have an alarmingly high amount of butter and fat as cheesecakes go, but it is not a recipe to compromise on with lower fat shortcuts, at least not before doing it once to see how it's really supposed to turn out. The story continues in the instructions.
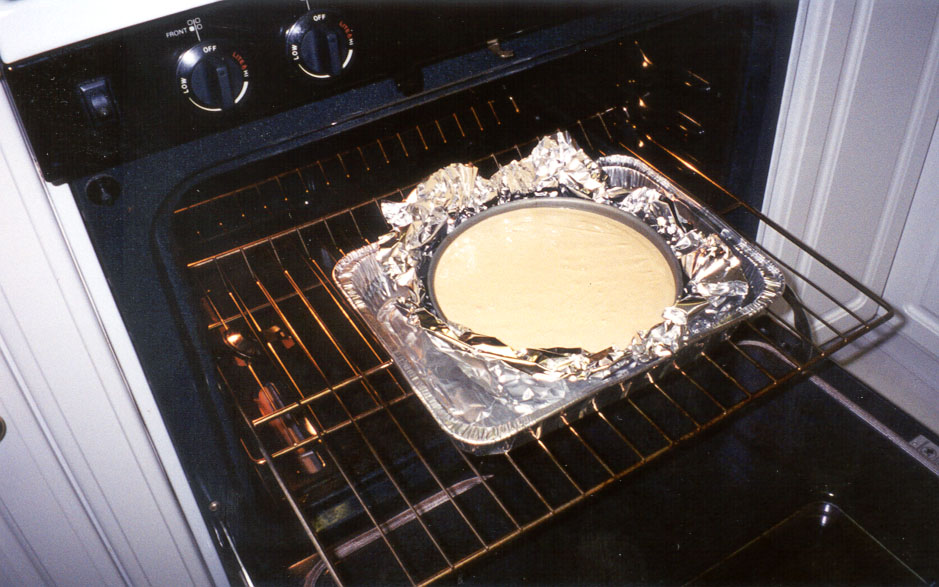
Four years later Paul makes the request again for his birthday. [Actually a few other requests had been made in the intervening years, but the cheesecake team had gotten a bit out of practice and and was not delivering product so easily anymore.] A few nights before, the evening after-work cake execution deed is started. But no cocoa in the cupboard! bob goes out to Whole Foods for a superior European brand. A 30 minute delay. All the dry stuff is in the Kitchen-Aid mixer, but bob forgot to read ahead. Sour cream in the batter, but of course no sour cream on hand. Ani takes over and turns on the mixer while bob goes back out to a local Wawa for the dairy product. Upon return, she does not report any troubles. The bottom layer is successfully in the pan, and goes into the oven for 30 minutes and then into the refrigerator for say 15 minutes while the batter is mixed. The clock is running so in goes the batter and back into the oven in the biggest roasting pan we have, wrapped in foil to prevent the water bath from seeping in. An hour and 3/4 or so. Then out and into the refrigerator.
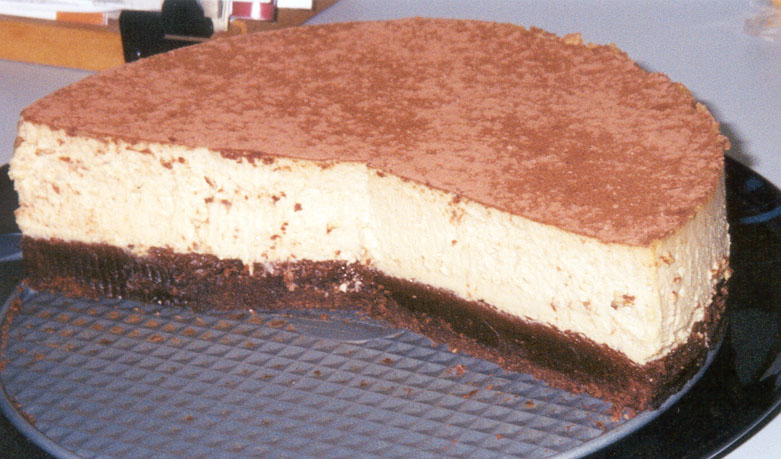
The dusting of the surface with cocoa we left until serving time, doing the individual slices. A few eaters complained of too much dusting on the top. Maybe the dry cocoa at serving time should be kept to a minimum. But check out the beautiful cappuccino coloring of the unadorned cake. The water bath seems to prevent cracking very nicely. Sometimes a hassle is worth the price.
Well, Paul asked again for cheesecake, this time for his 51st birthday, but as we age, our patience has waned. Water bath? Is it really necessary? We decide to do the experiment by skipping it to see if it justified the extra effort. And waiting for the crust to cool down completely so it can heat up again in the oven? Seems a bit exaggerated: it puffs up a bit in the middle during its initial baking, so why not just wait about 10 minutes till it settles down, and slap the filling on it before jamming it back into the moderate oven.
We decide to do a full recipe split for two 8 inch cheesecake pans but add one more 8oz package of cream cheese with 1/3 c sugar to make sure each one still stands tall. We kicked it up a notch with a 2 T hit of Kahlua Especial, the upscale edition of Kahlua liqueur, added with the coffee powder. We baked the pair 1 1/4 hours on a cookie pan (they leak) but then let them cool in the closed oven overnight to make sure they were baked through, given the low baking temperature of 300�. One had a small crevasse in the center, but the other retained a perfect surface skin. For the larger size, perhaps 1 1/2 hours baking is warranted. Check out the result photos above.
The verdict? No water necessary, no long wait either. And this time, we lightly sprinkled some high quality French Valrhona cocoa using a small sieve shaker only over the central region of the top surface leaving a ring of tan cheesecake showing for aesthetic reasons. The caramel sauce streaking of serving slices is a nice touch but only if you are serving under controlled circumstances. We have not done it since the initial experience. Only days later we go with the original.
This one rises to the top to join the elite lineup of our proudest cheesecake products. A hands down winner for the chocoholics among us. And now easier than ever!
If you were reading carefully above, by 2006 we had finally acquired the fantabulous Kitchen-Aid mixer (with the pasta roller attachment, but that is another story), and it does the chocolate crust butter-flour-sugar combining effortlessly. Good thing we were able to make that buy before the global economic melt down of 2008. Otherwise we'd still be fighting that crust battle.
We should rename this Paul's cheesecake, since his reoccurring birthday gives bob the excuse to remake this cheesecake, which happens to also be a bob favorite. This year, coupled with the new century cheesecake sensibility, bob decided to try a half crust recipe considering that this layer is so tall, and 2/3 the batter recipe to lower the profile a bit, but he forgot to read the details about prebaking the crust, until after nicely jiggling the batter evenly in the pan over top the unbaked crust. Perhaps the thinner crust will compensate for this gross oversight. We used aluminum foil around the sides of the 9 in cheesecake pan and stuck it in a slightly larger rectangular baking pan for the water bath treatment. As you may have gathered from the 2006 update, we had finally acquired a Kitchen-Aid mixer and the crust really does come together in about 3 minutes at higher speed, but the most efficient way of laying it out in the pan is pressing in globs with your hands as bob does. The chicken pounder presses fine, but acts like a suction cup pulling up the crust a bit when you try to pick up the pounder from each press. Smoothing it out with a flatish icecream scoop seemed to work better at evening out the hand pressing first go at it. The Kitchen-Aid also makes the batter mixing a lot easier as well, making for a creamy consistency if you can wait till your cream cheese is at room temperature, which bob usually cannot do. By the way 4 eggs don't like a 2/3 scale down, so we used 2 eggs plus 1 yolk, and 1 T of Kahlua.
So we baked it about an hour and 45 minute—it seemed to test done with a toothpick, but to make sure we left it in the oven to slowly cool down after we turned it off. We used Girardelli cocoa for the serving and cut it easily with the Titanium knife we keep around just for these special occasions. Ani, who is pretty diffident about dr bob desserts said she really liked it, as did her mom who was afraid it might be too sweet, but no danger since the cocoa dusting and the crust nicely balance the not so obvious sweetness of the batter. The lower profile also made this a much less outrageous splurge than it was before. Another success story for the team. See the updated photos.